Deep Dive: Truss Rods
If you haven’t picked up on it, all of the articles here tell you what to expect right in the title. “Short Takes” are quick hits, usually only a page or so on an interesting or unusual topic. “Terminology” covers unique Rickenbacker features or specifications that often come with their own lingo. “Overview” tells you everything you need to know about a specific model or family or feature, including details on their evolution over time. “Deep Dive” takes a topic that would normally get classified as “Terminology or “Overview” and goes deep. Like, way deep.
I tell you this because usually I know what I’m going to do when I start an article. The title is always the first thing I write. And the first thing I wrote when I started this article was “Terminology: Hairpin Truss Rods”…but the scope kept creeping. After a couple days I changed it to “Overview: Truss Rods”. Several days later “Overview” became “Deep Dive”. Sometimes it just happens like that. Consider yourself duly warned!
At some point in almost any discussion of Rickenbacker minutia the term “hairpin truss rods” is going to come up. Largely because the hairpin truss rod is a misunderstood and unfairly maligned beast. Unfortunately that reputation makes Rickenbacker ownership daunting to some—and in fairness you do need to know what you’re doing to adjust one…or actually two! But if you do know what you’re doing, it’s one of the most stable systems out there. I have a 1977 4001 with perfect action that I haven’t adjusted since I bought it in 1989!
But if you’re still scared, fret not—there are plenty of Rickenbackers out there with more traditional truss rods systems. More of those than there are with hairpins, in fact. So how do you know what kind of truss rods your guitar has? By the time we’re done here you’ll know exactly how to answer that question—and hopefully be a little less afraid of hairpins.
Now look, I’ll tell you right up front there is nothing I can “add” to the knowledge base about Rickenbacker hairpin truss rods or truss rods in general—it’s all out there if you take the time to look for it. What I can do, however, is put it all in one place with illustrations to “show” and clear language to “tell”, so that’s what we’re going to try to do. That’s the whole point of this site!
So let’s begin by learning about all the types of truss rods out there and how they work—because Rickenbacker has used almost all of them in addition to the infamous “hairpin”. Ready? Let’s go!
So why do truss rods even exist in the first place? The answer is string tension. Wood is strong, but everything bends if you pull on it long enough and hard enough. And that’s what guitar strings are doing: constantly trying to turn your neck into a banana by pulling the headstock towards the bridge.
The modern truss rod’s job is twofold: give the neck additional structural strength—like rebar in concrete—and mechanically counteract the tension of the strings. So how does it do that?
We begin with the very first type of truss rod—a simple, fixed metal bar or tube inset into the neck to provide additional structural strength. And that’s all it does. As the name implies, it’s not adjustable in any way, it’s just…there, to add some strength to help keep that neck from bowing.

This type of truss rod first appeared in the 1920s and was commonly used up until the 1970s—although usually on lower-end guitars like Valcos and Danelectros after the single action truss rod gained popularity in the 1930s and 40s.

Straight is good, and simple fixed truss rods like these will absolutely help keep your neck straight. But here’s the thing: you don’t necessarily want your neck to be razor straight—a little bit of bow or “relief” keeps strings from buzzing and allows for lower playing action.
Which brings us to the single action truss rod, still one of the most commonly used today. Patented by Gibson in the early 1920’s, the single action truss rod gives the same structural strength as a fixed rod and adds adjustability—although only in one direction. Thus the “single action” nomenclature.
Here’s what it looks like and how it works:

A curved channel is cut into the middle of the neck—either from the top or the bottom—into which the truss rod assembly (the red, yellow, and blue parts in the diagram above) is placed. The remainder of the channel is then filled with another piece of wood so that the truss rod is held in place at the bottom of that curved channel. The Fender “skunk stripe” is a great example of how this looks when the channel is cut from the back of the neck.
When it is cut from the top, the filler strip is hidden by the fingerboard. Note in the diagram above how “deep” into the neck that channel is at the midpoint—we’ll come back to why that’s important later.
So now let’s talk about the components of the single action truss rod and how they work together. Here are the key parts:
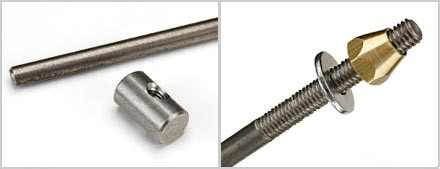
In the photo on the left we have the anchor (yellow in the diagram above), and one end of the rod itself (red in the diagram above). The picture on the right shows the threaded other end of the rod , a nut (blue in the diagram above, and a washer which acts as a thrust plate.
The anchor is set into the neck and the rod is attached to it—sometimes welded, sometimes threaded into place. The anchor can even be just a sideways 90 degree bend in the rod! The goal is of the anchor is to keep the rod immovable at one end so the magic can happen at the other end.
At that other end we have the thrust plate and the nut. The thrust plate caps off the truss rod channel. When you tighten the nut it pushes up against the thrust plate—which receives the pressure on the rod that turning the nut creates, yet doesn’t move. So as you tighten the nut it “pulls” the threads of the truss rod through the thrust plate. And since the rod is a) anchored at the other end and b) curved because it’s set in a curved channel, as you pull it it tries to straighten out. As it does so, it presses upward against the top of the truss rod channel. This puts pressure on the neck to bend upwards towards the middle—to induce what is called “backbow”—in opposition to the string tension which is trying to pull the neck into a “upbow”. Put more plainly, string pressure is trying to pull the neck into a bow and tightening the truss rod creates pressure in the opposite direction that straightens it back out.
So with a single action truss rod, by tightening that nut you can take the neck from this:

To this:

Now let’s go back to that truss rod depth. The reason the truss rod is sunk as deep into the neck as it is is because a lot of force is being applied at that center point where the truss rod is pressing upwards on the top of the channel. You want as much structural strength at that point as possible to stand up the mechanical force the truss rod is exerting—you want a lot of wood there so you need to sink the truss rod deep. Overall it’s a remarkably simple yet effective design.
But here’s the problem with single action truss rods: they only go one way. Which is to say they can only apply force in one direction. Loosen the nut and the rod will go back to where it started—but no further. So what do you do if you need the neck to have MORE of a bow—if the neck is already “backbowed”?

Now wait just one second! I’ve just explained to you how string tension is constantly trying to turn your guitar neck into a banana, so what causes backbow? Well, if you leave a guitar with the strings loose or off for a long time with that truss rod still pushing up, that’ll do it for sure. But far more common is the fact that wood just warps. Changes in temperature, changes in humidity…wood just moves over time—especially if the grain of the wood is predisposed to go in a particular direction. Add in different woods for the neck and fingerboard that may have different grain structures and react differently to changes in the environment…stuff just happens. And a single action truss rod can’t fix a backbow.
Enter the modern dual action two-way truss rod, which became common in the late 1990s/early 2000s. If the single action rod works by straightening a curved rod to apply mechanical force, the dual action two-way rod works by curving a straight rod in one of two different directions to apply mechanical force. So how does it do that?

So here we see both ends of a dual action two-way truss rod. It looks pretty different! For starters, there’s actually two rods—a flat bar on top, and a rod with ends threaded in opposite directions on the bottom. A threaded block is screwed onto each end of the threaded rod, and then the flat bar is welded to both threaded blocks. An adjustment screw is then attached to one end of the threaded rod. There is no anchor, no thrust washer. All the elements are self contained.
A straight channel—just a bit deeper than the entire assembly’s height—is cut into the neck right below the fingerboard. There does not have to be a filler strip like on a single action truss rod—although there can be—the rod usually comes directly into contact with the underside of the fingerboard. Consequently the truss rod doesn’t go nearly as deep into the neck as it does on a single-action rod, so the neck can be thinner—another plus for this type of truss rod. And the entire rod assembly can be slid in and out of the channel without removing the fingerboard or requiring any special tools—yet another plus!
Turning the adjustment screw clockwise causes the two threaded blocks to move closer together. This in turn causes the flat bar to bend upward, applying force to the underside of the fingerboard and bending the neck upwards to induce backbow—just like the single action truss rod. Turning the adjustment screw counterclockwise makes the threaded blocks move further apart. This causes the rod to bend downward, applying force to the bottom of the truss rod channel and bending the neck downwards to induce upbow. It’s a brilliant design.

Let’s take a moment to break down the name “dual action two-way” because it’s describing two different things. “Dual action” refers to the fact that there are two rods doing two different things, compared to the “single action” truss rod which only has one rod doing one thing. “Two-way” because, well, it adjusts two different ways, either reducing or increasing bow in the neck.
I make this point because when we talk about the Rickenbacker hairpin truss rod—which we’re finally going to do now!—you will see that by that definition it is a dual action truss rod even though it’s technically only one piece of metal Here, a diagram should make it clearer:

We start with a long bar, folded in half like a hairpin—thus the name. One end is a little longer than the other and threaded. A spacer or thrust block is slid onto the threaded end and held in place between the shorter end of the bar and the adjustment nut. A channel is cut into the neck below the fingerboard just like on our dual action two-way truss rod. Tightening the nut pushes the shorter end of the rod against the thrust plate and forces it to bow upward against the underside of the fingerboard inducing backbow. This provides the mechanical force needed to change the bow of the neck.
Now, like a single action truss rod it only adjusts in one direction. Loosening the nut will not cause the rod to bow in the opposite direction—it will only return to its starting point. So dual action, but not two-way.
So why is that so daunting to so many people? Doesn’t sound that different to me? It’s because you use it in a very different way. On both single action and and dual action two-way truss rods you turn the screw until the desired neck shape is reached. Easy peasy. On a Rickenbacker with hairpin truss rods you manually move the neck to the position you want then tighten the truss rods to lock it in place.
Wait, what? Yup. You’re going to use your hands to bend the neck to where you want it to be, hold it in place, then tighten the truss rods to keep it there. Adjust it like you would a normal single action truss rod and the mechanical force created can pop the fingerboard loose or even all the way off—or even crack the neck. Ever wonder why you see so many older Rickenbackers with repairs that indicate this type of damage?

It’s because somebody didn’t know what they were doing. (And yes, I know that at least one of you knows all too well that this particular guitar had modern truss rods, but it’s a good illustration of what the damage looks like, ok Mister Growlyman?)
Now I’ll admit that all sounds pretty scary. Bending the neck with your hands? Don’t worry. The neck is stronger that you think it is—especially on the neck through models like the 4001 and 620. You do need to make sure you’re holding both ends of the neck when you’re working with a set neck semi-hollowbodied guitar like a 330 or 360 to avoid putting stress on the neck joint, but the neck itself can take it. And once it’s set? You’re going to find it’s very stable.
For what it’s worth, even for other truss rod systems it’s always a good idea to give your neck a little manual assistance while adjusting. If nothing else it will make turning the adjustment nut a little bit easier by removing some pressure from the rod.
So that’s an overview of the types of truss rods you’re going to encounter on a Rickenbacker. But before we get into figuring out what you have, I let something slip above when I said “truss rods”—plural. Because for much of their history most Rickenbackers had not one but two truss rods.
Why? Well, it’s a little telling that the first instrument to feature two rods was the 4000 bass. You see, the primary idea behind the twin rods was that it allowed you to set slightly different relief—and therefore slightly different action on either side of the neck to improve playability. Given the large disparity in diameter between the low E string and high G string, and the difference in tension between the two (up to 10-15 pounds more for the higher strings), you can kind of see how that might make sense.
Other key reasons cited include the additional structural strength the extra rod imparts—and given how slim vintage Rickenbacker necks were compared to their single-action rod equipped contemporaries this is probably a pretty legitimate concern—and their ability to correct a twisted neck. Here’s a pretty extreme example of a twisted neck:
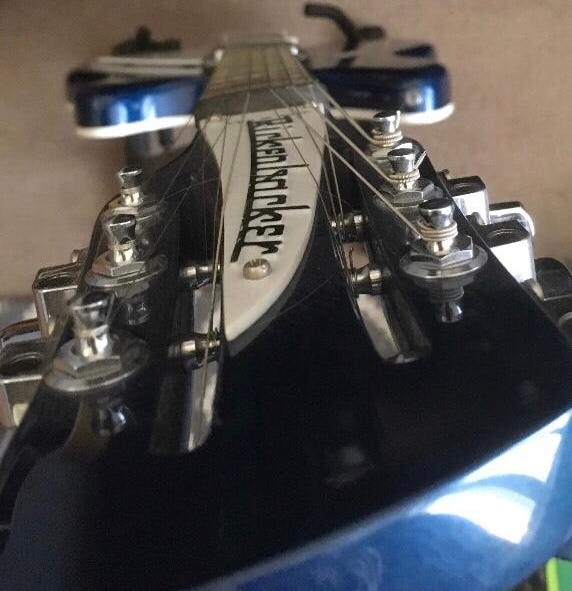
While a twist that bad would likely also require heat and clamps to correct, milder twists can be corrected with manual pressure and the truss rods alone. Ask me how I know!
Rickenbacker believed strongly enough in the benefits of the dual rod system that it lasted for over sixty years—even though the added complexity of having two rods to adjust amplified the confusion around the completely different adjustment process, ending up convincing many people that the whole system was just too darned complicated and finicky. That’s not necessarily fair, but it is nevertheless the perception.
So now that we understand how all the different types of rods work and why there are two of them, let’s segue into how you can tell what kind of truss rods a specific guitar has. We’re going to go chronologically—and apart from transition periods that’s usually enough. But for those transition periods—and just because it’s good to know in general—we’ll also go into how to visually identify all the various truss rods used.
The dual truss rod idea was there from the start, with prototype Combo 800s featuring two rods—although only one would be used once production began.
But the hairpin rod showed up very early in the timeline. Did those very first Combo 600s and 800s have hairpins? I haven’t been able to confirm. But when the Combo 400 launched in 1956, it absolutely did—as would all subsequent models—if only one instead of two.

While most guitars from this era have a nicely routed channel for truss rod adjustment access, you’ll also find some Capris with a crude Forstner bit channel!

Note how on these early single truss rod models how an oversized nut was originally used for the thrust plate before the larger thrust block we talked about earlier was introduced in late 1960/early 1961. When dual truss rods were introduced on the 4000 in 1958 they also had the oversized nut thrust plate at first.

All guitars would get dual hairpin truss rods around late 1960/mid 1961. Note that the semi-hollowbodied Capri models never had two rods. Semi-hollowbodied guitars would not get two rods until the redesigned “New Capris” launched in mid 1961. Along with the dual truss rods came a single thick aluminum thrust block. This design would remain effectively unchanged for over twenty years.

The first change of note would come in 1979 when the 4003 launched. The change wasn’t what you might expect given that the whole rationale for the 4003 was to beef up the 4001’s neck to better withstand the tension of roundwound strings. So how did they attempt to accomplish that? By turning the dual hairpin truss rods around to adjust from the body end of the neck instead of the headstock for…reasons?
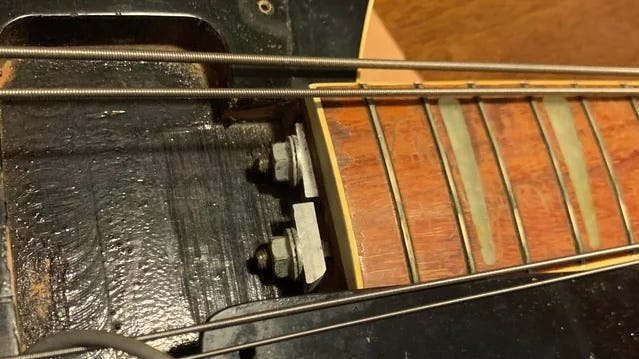
Note how the thrust plate is split into two pieces and the adjustment nuts are much smaller on many of these guitars with “backwards” hairpin rods. Note also that these “backwards” rods only appeared on the 4003. All other guitars remained unchanged.
Now many people think that the 4003’s truss rods were different from the hairpins at launch, but that’s just not true. The good news is that these early guitars are pretty easy to spot—to make adjustment easier the pickguard was split into two parts so you wouldn’t have to remove the entire pickguard to adjust the truss rods.

You can also identify these hairpin-equipped guitars by removing the truss rod cover. There you will find extensions of the truss rod channels to allow installation…and that’s it.

The backwards hairpin truss rods were just a slight detour on the road to the first major change to Rickenbacker truss rods since the modern era began in 1954. And that change would happen in 1984 when the 4003’s truss rods would change from dual hairpins to dual single action rods.
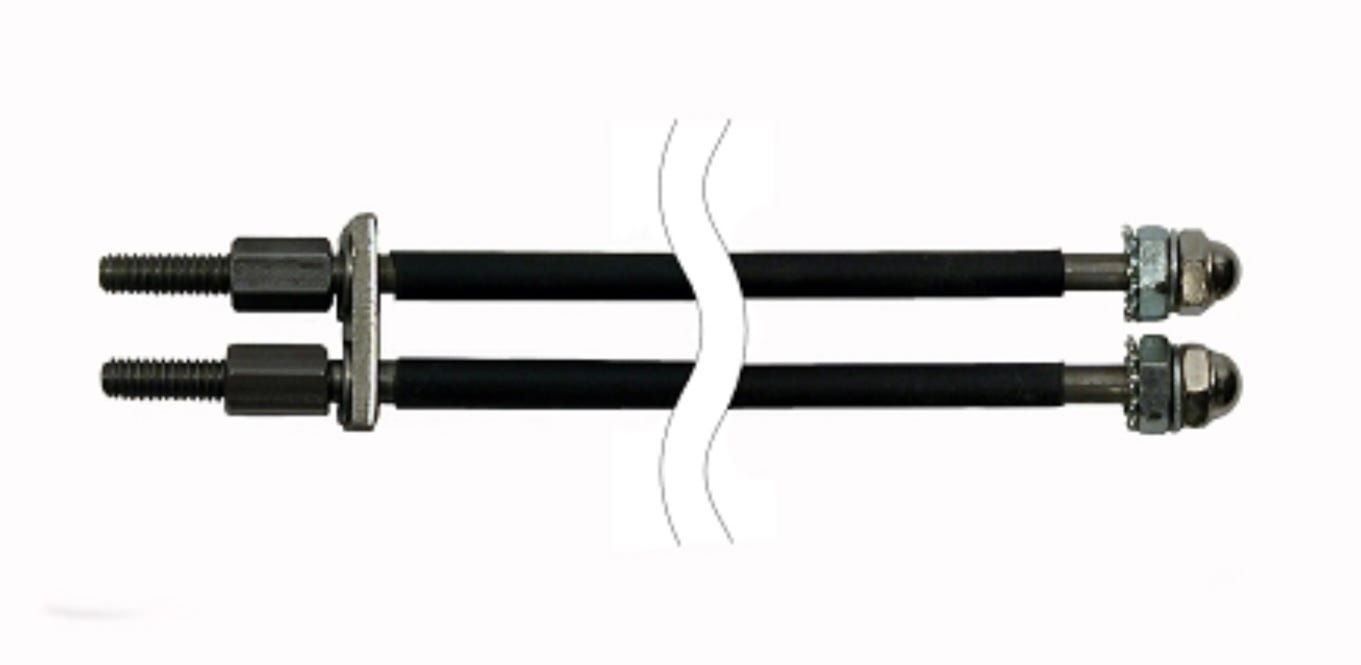
You already know what you’re looking at here—there’s just two of everything except the thrust plate. Two rods, two adjustment nuts, and two anchors composed of a toothed lock washer, a nut, and a domed acorn nut.
But adjustment wouldn’t return to the headstock just yet. It would take until mid 1985 for the rods to be reversed. So you have to look a little more closely at 1984-85 4003s to know what type of truss rods you have because those transitional guitars still have the split pickguard. The easiest way to identify these transitional guitars is to remove the truss rod cover.
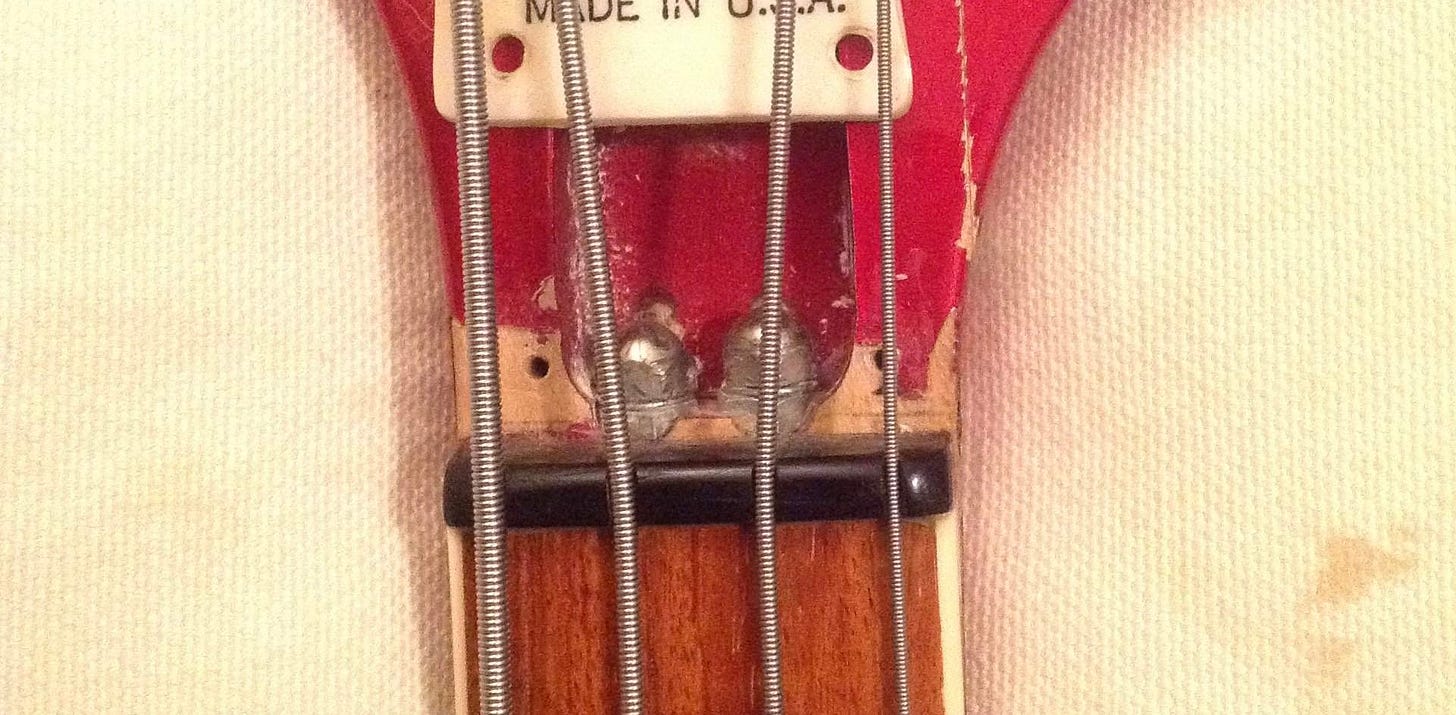
Instead of the threaded rods, adjustment nuts and thrust plate we’d expect to find here, we find the anchors with their acorn nuts. All of the adjustment bits are still at the tail end.
Once the rods turned back around the “right way”, the split pickguard would disappear in mid 1985. I’d still look under the headstock on all 1985 4003’s though just to confirm what you have.
That said, it can be a little difficult to tell the difference between the two truss rod types just by looking at the adjustment nuts. There are two other things to look at that will clear it right up though—and this holds true for all guitars, not just the 4003 (spoilers!).
So first let’s look at the old hairpin rods:

As the photo highlights, the thrust block is thicker aluminum and, because hairpin truss rod channels are uncovered, we can see both the ends of the channels and the rods inside them.

Guitars with single action rods have a thinner, steel thrust block, and because single action truss rod channels are filled with a wood strip, we can’t see into the channels.
This is a good point to remember how much deeper into the neck single action truss rods are set. When you hear people talk about how much beefier 1980s 4003 necks (with single action truss rods) are when compared to 1970s 4001s (with hairpin truss rods)…now you understand why that is. The 4001’s slim neck simply wasn’t thick enough for the new rod system.
While I may have spoiled it, over the course of 1984-85 ALL guitars transitioned to the dual single action rods, although the exact timeline is unclear. So for all six and twelve string guitars from 1984-85 you just have to check. One way to know for sure which truss rods you have is to remove the truss rod cover and take a peek and compare to what you learned from the examples above.
But the easier way is to take a look at the other end of the neck. On guitars with the single action rods you can see two large holes in the base of the neck below the fingerboard for the recessed anchors.

And on guitars with hairpin rods the truss rod channels at the base of the neck are smaller and closer—and they don’t have a shiny acorn nut peeking out at you!

And while these tips are especially handy in identifying the rods in a transitional era 1984-1985 guitar, they hold true for any guitar made between 1961 and 2024. Oops, another spoiler!
But before we explore that, I’m going to say something provocative. John Hall and period literature and the user manual all referred to the new single action truss rods as two-way. But they’re not. They’re just not. I’ll lay it out like this. For a truss rod to truly be two-way, when the nut is a neutral position—no tension at all on the rod—turning it clockwise will induce a backbow, and turning it counterclockwise will induce a forward bow. If you turn the Rickenbacker truss rod counterclockwise from neutral position it will not induce a forward bow. The nut will just come off the rod.
So why did Hall and the literature and the user manual refer to it as two-way? Artistic license, I’d say. You see, when the guitar leaves the factory the nut isn’t at neutral position. It has already been set to put the neck in backbow to combat the string tension. So there is technically some adjustment the “other way”…but only back to neutral. So I guess because you can create “less” backbow by backing the nut off some you could interpret the action as “two-way”…but it’s just not. It’s not. Rant over!
Now while everybody thinks “hairpins” first when you think about Rickenbacker truss rods, when you do the math the single action truss rods actually had a longer run! But their era would begin to end in 2019 with the launch of the Al Cisneros 4003AC Signature Limited Edition which featured—for the first time since 1961–a single truss rod and—for the first time ever—a dual action two-way truss rod.
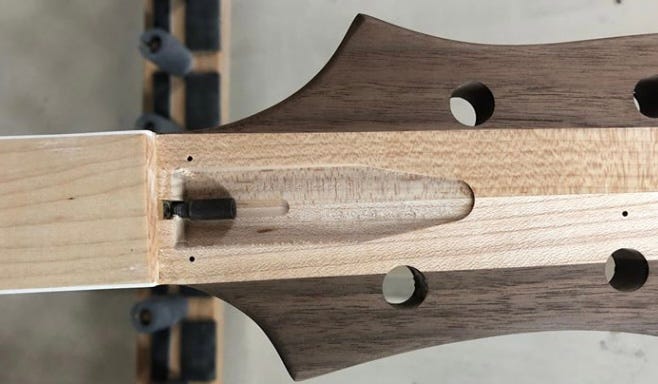
While the first 4003ACs featured the existing and now way too large truss rod adjustment channel rout on the headstock, it didn’t take long for a simpler, more appropriate rout to appear.
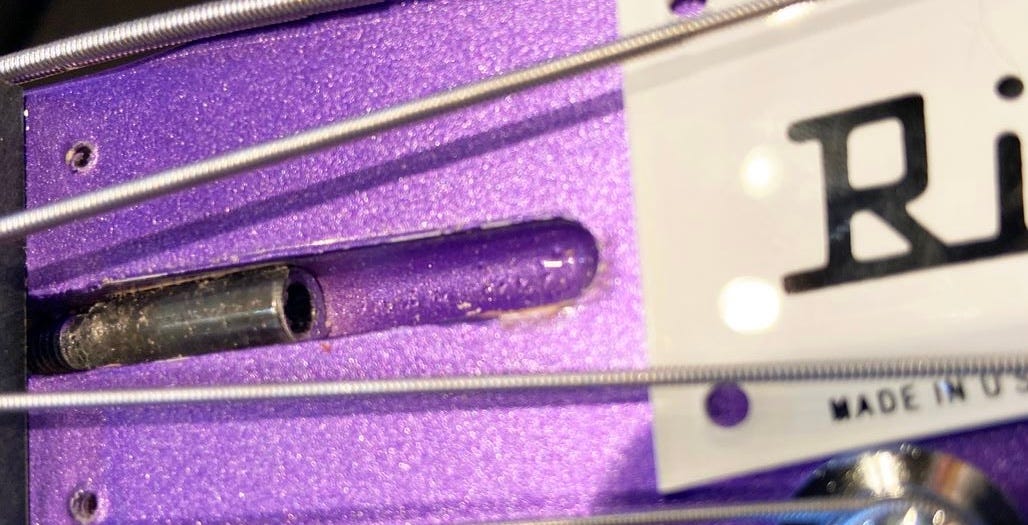
In addition to the 4003AC the new single truss rod would start appearing on special run 4003s in 2020–like the Andy Babiuk guitar above—but the twin single action rods would remain the default until 2022. At that point they became standard on all basses. Not at all coincidentally, at around the same time the 4003 neck got much slimmer—you no longer had to have a thick neck to handle deeply buried curved single-action truss rod channels!
Funnily enough, right around this time you started seeing complaints—for pretty much the first time—about brand new guitars with twisted necks. Kinda ironic that there were suddenly complaints about something that could no longer be fixed, no? Maybe Rickenbacker had been right all those years about the extra stability that extra rod delievered…
In 2024 guitars got the single truss rod as well. The double truss rod era was over! Well…with a couple of exceptions. In the name of “historical accuracy”, the reissue 325C64 and 360/12C63 continue to feature twin truss rods. But historical accuracy only goes so far—these guitars feature the “modern” single-action truss rods instead of the hairpins their namesakes came equipped with.
Similarly, the 325V59 and 325C58 featured only one truss rod during their respective runs as 1958 Capris were thusly equipped, but again a modern single action rod was utilized.

After having now written much more on this topic than I had originally expected or intended, I find myself at a loss for how to finish it. I think I’ve said all there is to say, but can’t find a neat way to bring it all to a conclusion. So let’s just say that you now know all you ever wanted or needed to know about Rickenbacker truss rods, and if you want to learn everything you ever wanted or needed to know about…everything else, you can check out the site map here!


Best article on RiC truss rods I’ve seen. Thanks for the time and effort to put this together.
Great and actually really concise article (if you think about all it covered).
The beheaded ‘57 4000 headstock photo added a dramatic touch of horror! 😅